Integrating Hydro-Québec Data into Home Assistant

Why I Built This: Home Assistant + Hydro-Québec
I have always wanted direct access to my Hydro-Québec data. Real-time consumption, peak events, pricing, etc. But for years, there was no easy way to get it.
Hydro-Québec offered Hilo, their smart home program, which promised automated demand response and energy savings. On the surface, it looked perfect. But there was a catch: I would lose control.
With Hilo, I would be giving Hydro-Québec control over my devices. I would be locked into their ecosystem, their app, their devices, and their decisions. I could not choose what devices I wanted, only what they approved. I could not automate things my way, only their way. And if something broke in their system or if they decided to discontinue the program? I would be left with incompatible devices and zero data access.
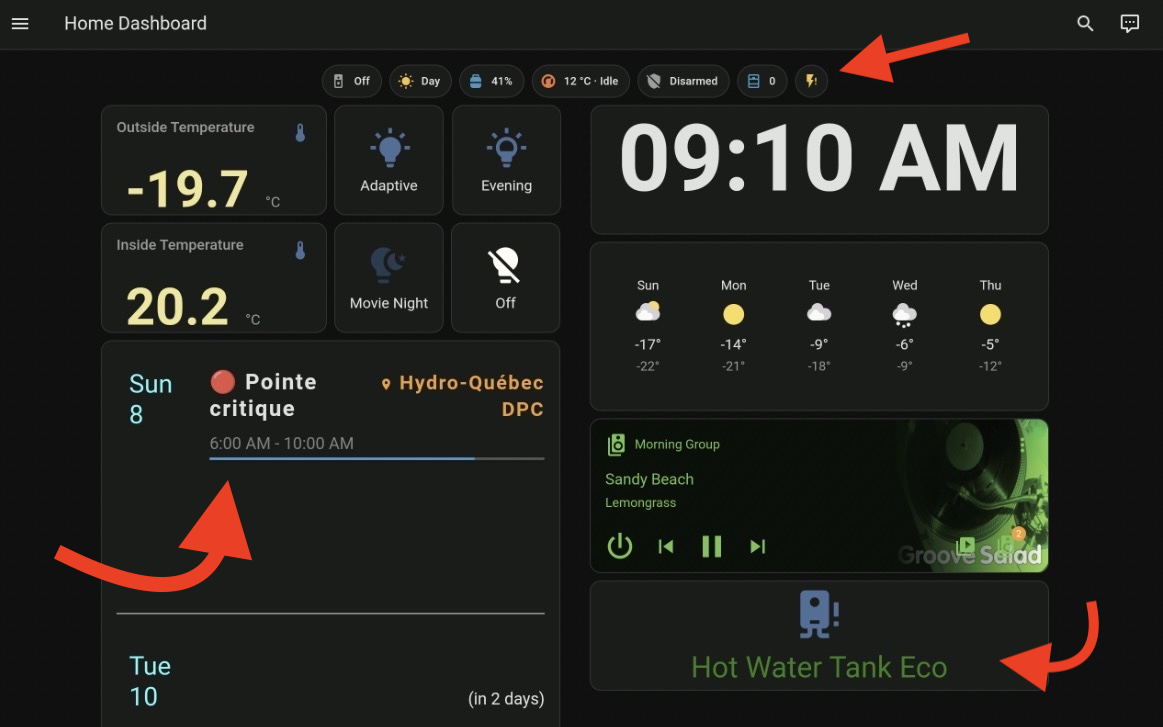
That’s where Home Assistant comes in. With Home Assistant and the HydroQC integration, I get all the Hydro-Québec data I need: peak events, consumption, dynamic pricing, without giving up control. I run it myself, I choose my devices, I automate it exactly how I want, and I am not dependent on any corporation’s goodwill to keep the service running.
Installing HydroQC Integration
The HydroQC integration is the recommended way to integrate Hydro-Québec with Home Assistant. It provides native integration without requiring MQTT or external services.
Install via HACS
Make sure HACS is installed in Home Assistant. If not, install it first from the HACS website.
Go to HACS → Integrations → 3-dots menu → Custom repositories.
- Add this repository URL:
1
https://github.com/hydroqc/hydroqc-ha
Select category: Integration, then click Add.
Search for “Hydro-Québec” in the HACS integrations list.
Click on Download (or Install), then click the download button.
- Restart Home Assistant for the integration to load.
Configuring HydroQC for Flex D
After restarting, you need to configure the integration for your specific plan.
Go to Settings → Devices & Services → + Add Integration.
Search for Hydro-Québec and select it.
Choose “With Hydro-Québec account”.
- Enter your credentials:
- Username: Your Hydro-Québec email
- Password: Your Hydro-Québec password
- Contract Name: A friendly name (e.g., “Home”)
Select your contract from the dropdown.
Choose your rate sector and plan → Select Rate Flex D.
Set preheat duration (e.g., 120 minutes) – this is how far in advance you want to be notified before a peak period.
Choose how many days of consumption history to import (0-800 days).
Enable or disable consumption sync (recommended: enabled for energy dashboard).
- Click Submit. Sensors will appear in ~60 seconds.
Energy Dashboard Setup with Low-Carbon Indicator
Hydro-Québec’s electricity has one of the lowest carbon footprints globally thanks to its hydroelectric generation. Tracking this in your Energy Dashboard is simple with the Electricity Maps integration.
Step 1: Install Electricity Maps Integration
Go to Settings → Devices & Services → + Add Integration.
Search for Electricity Maps.
Enter your API key (get a free one from Electricity Maps).
Select your location (Quebec, Canada).
Click Submit.
Nothing else to do. The integration automatically tracks the carbon intensity of your electricity grid in real-time.
Step 2: View Carbon Data in Energy Dashboard
Once Electricity Maps is configured:
Go to Settings → Dashboards → Energy.
Click the ⚙️ Settings (gear icon) in the top right.
The Energy Dashboard automatically correlates the carbon data from Electricity Maps with your consumption data.
You will see carbon intensity displayed directly on your dashboard with no additional configuration needed.
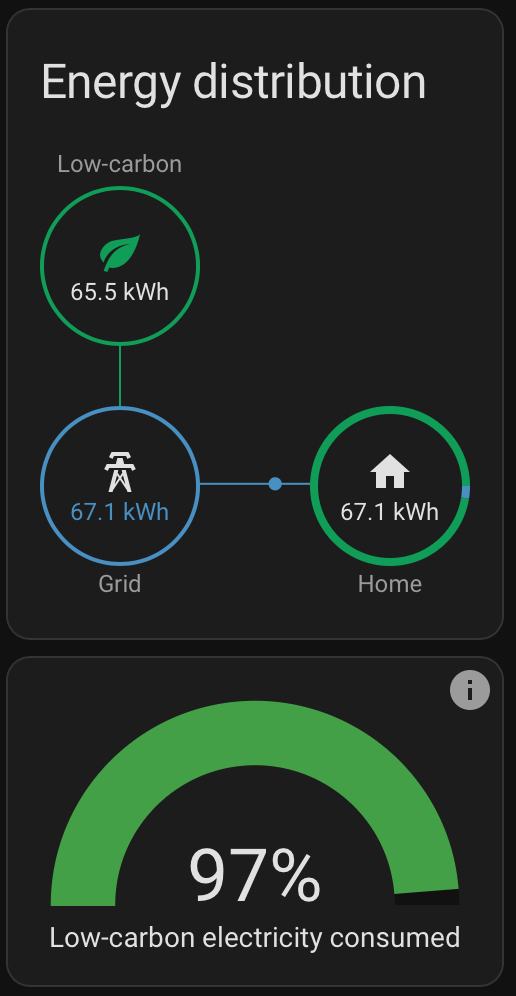
Electricity Maps handles all the heavy lifting: it knows Quebec’s electricity is ~99% hydroelectric and will display the low-carbon footprint (approximately 2 kg CO₂/MWh) automatically based on real-time grid conditions.
Flex D Sensors and Binary Sensors
HydroQC exposes several sensors for Flex D rates.
Available Sensors from HydroQC
| Sensor | Type | Description |
|---|---|---|
sensor.hydro_quebec_home_current_dpc_period_detail | Text | Current period: “normal” or “peak” |
sensor.hydro_quebec_home_next_peak_start | Timestamp | When next peak begins |
sensor.hydro_quebec_home_next_peak_end | Timestamp | When next peak ends |
sensor.hydro_quebec_home_next_pre_heat_start | Timestamp | When preheat window begins |
Creating Binary Sensors for Automation
To use Flex D effectively in automations, create binary sensors that are easier to trigger on. Add these to your configuration.yaml:
1
2
3
4
5
6
7
8
9
10
11
12
13
14
15
16
17
18
19
20
21
22
23
24
25
26
template:
  - binary_sensor:
      - name: "Flex D Peak Now"
        unique_id: flexd_peak_now
        state: >
          {{ now() >= states('sensor.hydro_quebec_home_next_peak_start') | as_datetime
             and now() < states('sensor.hydro_quebec_home_next_peak_end') | as_datetime }}
        icon: >
          {% if is_state(this.entity_id, 'on') %}
            mdi:flash-alert
          {% else %}
            mdi:flash
          {% endif %}

      - name: "Flex D Preheat"
        unique_id: flexd_preheat
        state: >
          {% set start = states('sensor.hydro_quebec_home_next_peak_start') | as_datetime %}
          {% set pre   = start - timedelta(hours=2) %}
          {{ now() >= pre and now() < start }}
        icon: >
          {% if is_state(this.entity_id, 'on') %}
            mdi:radiator
          {% else %}
            mdi:radiator-disabled
          {% endif %}
What these do:
binary_sensor.flex_d_peak_now: Turns ON during actual peak periods, OFF otherwise. Use this to trigger load-shedding automations.binary_sensor.flex_d_preheat: Turns ON 2 hours before a peak period (adjust thetimedelta(hours=2)value as needed). Use this to pre-warm/pre-cool your home or pre-charge batteries before peak rates hit.
Checking Your Sensors
After saving your configuration:
Go to Developer Tools → YAML → Check configuration.
Restart Home Assistant if valid.
Check Developer Tools → States and search for:
binary_sensor.flex_d_peak_nowbinary_sensor.flex_d_preheat
They should now appear with live states.
Creating Flex D Automations
Now that you have sensors tracking Flex D peaks and preheat windows, create automations to respond automatically.
Automation: Preheat + Peak
Pre-condition your home before peak rates kick in:
1
2
3
4
5
6
7
8
9
10
11
12
13
14
15
16
17
18
19
20
21
22
23
24
25
26
27
28
29
30
31
32
33
34
35
36
37
38
39
automation:
  - id: flexd_preheat_start
    alias: "Flex D – Start Preheating"
    trigger:
      - platform: state
        entity_id: binary_sensor.flex_d_preheat
        to: "on"
    action:
      - service: climate.set_temperature
        target:
          entity_id: climate.living_room
        data:
          temperature: 22  # Preheat to comfortable temp

  - id: flexd_preheat_end
    alias: "Flex D – Peak Period Active"
    trigger:
      - platform: state
        entity_id: binary_sensor.flex_d_peak_now
        to: "on"
    action:
      - service: climate.set_temperature
        target:
          entity_id: climate.living_room
        data:
          temperature: 18  # Lower temperature during peak

  - id: flexd_peak_end
    alias: "Flex D – Peak Over, Resume Normal"
    trigger:
      - platform: state
        entity_id: binary_sensor.flex_d_peak_now
        to: "off"
    action:
      - service: climate.set_temperature
        target:
          entity_id: climate.living_room
        data:
          temperature: 20  # Resume normal temp
Tips and Best Practices
1. Check Your Entity Names
Entity names may vary based on your contract name. If your contract is called “Cottage” instead of “Home”, your sensors will be:
sensor.hydro_quebec_cottage_next_peak_startsensor.hydro_quebec_cottage_next_peak_end
Use Developer Tools → States to confirm your exact entity IDs.
2. Set Preheat Duration Wisely
In integration options, set preheat duration to match your use case:
- 60-90 minutes: For quick preheating of smaller homes.
- 120-180 minutes: For larger homes that need more time to reach comfort temperature.
- Adjust in options: Go to Settings → Devices & Services → HydroQC → Configure to change preheat duration anytime.
3. Combine with Battery or EV Charging
If you have a home battery or EV charger:
- Use the preheat window to charge batteries fully before peak rates.
- Use the peak period to discharge batteries or shift loads to battery power.
4. Monitor Your Savings
Track how much you save with Flex D by:
- Adding a utility meter helper in the Energy Dashboard for peak vs. off-peak consumption.
- Comparing your monthly bills before and after optimization.
5. Test Your Automations During Off-Peak
Before trusting peak-period automations:
- Manually trigger
binary_sensor.flex_d_peak_nowby adjusting system time. - Verify your automations run as expected.
6. Enable Consumption History Sync
During initial setup, enable consumption sync to:
- See historical consumption data in your Energy Dashboard.
- Get accurate tariff-based cost calculations.
- HydroQC can import up to 2 years of history.
Conclusion
You now have a complete, open-source smart home energy management system for Hydro-Québec’s Flex D rate.
Real-time data access – No contract, no lock-in, no loss of control
Accurate consumption tracking – Peak vs. off-peak energy usage at a glance
Carbon footprint visibility – Real-time understanding of your electricity’s environmental impact
Automated peak response – Your home adapts automatically during peak periods
Complete customization – Choose your devices, build your automations, own your data
Future-proof setup – If anything changes, you control the outcome
From here, you can expand further:
- Add battery storage and shift loads to cheaper hours
- Integrate solar panels to maximize off-peak charging
- Build predictive automations based on weather forecasts
- Share consumption analytics and peak events timeline with household members
- Export data for personal analysis and optimization
The foundation is solid. The possibilities are endless. And you own it!
Additional Resources
- HydroQC Official Docs: https://hydroqc.ca/en/docs/
- Home Assistant Energy Dashboard: https://www.home-assistant.io/docs/energy/
- Electricity Maps Integration: https://www.electricitymaps.com/
- Hydro-Québec Flex D Info: https://www.hydroquebec.com/residential/customer-space/rates/rate-flex-d.html
- HydroQC GitHub: https://github.com/hydroqc/hydroqc-ha