Securing my homelab services with Caddy Reverse Proxy
This weekend, I tackled a project I’d been meaning to do for a while: centralizing my home services behind a single reverse proxy. Instead of juggling ports like homeserver:3001 or wrestling with certificate errors, I now have all my services running securely over HTTPS - accessible both locally on my LAN and remotely through Tailscale - using clean, memorable hostnames like git.home.arpa.
The Problem
Before this setup, accessing my services was inconsistent:
- Multiple services running on different ports (
homeserver:3000,homeserver:3001, etc.) - Certificate errors on services like UniFi that didn’t have proper SSL
- No consistent encryption across all services
- Awkward remote access without proper HTTPS
- Manual certificate management for each service
- Different bookmarks or mental overhead depending on whether I was at home or on Tailscale
The Solution: Caddy
I chose Caddy as my reverse proxy for several reasons:
- Automatic HTTPS with its own internal CA (no Let’s Encrypt dependency for local services)
- Simple, readable configuration language
- Built-in support for reverse proxying
- Works seamlessly with Docker
- Easy integration with Tailscale
- Minimal overhead while providing maximum security
What is a Reverse Proxy?
Before diving into the setup, here’s a simple diagram showing how Caddy works as a reverse proxy:
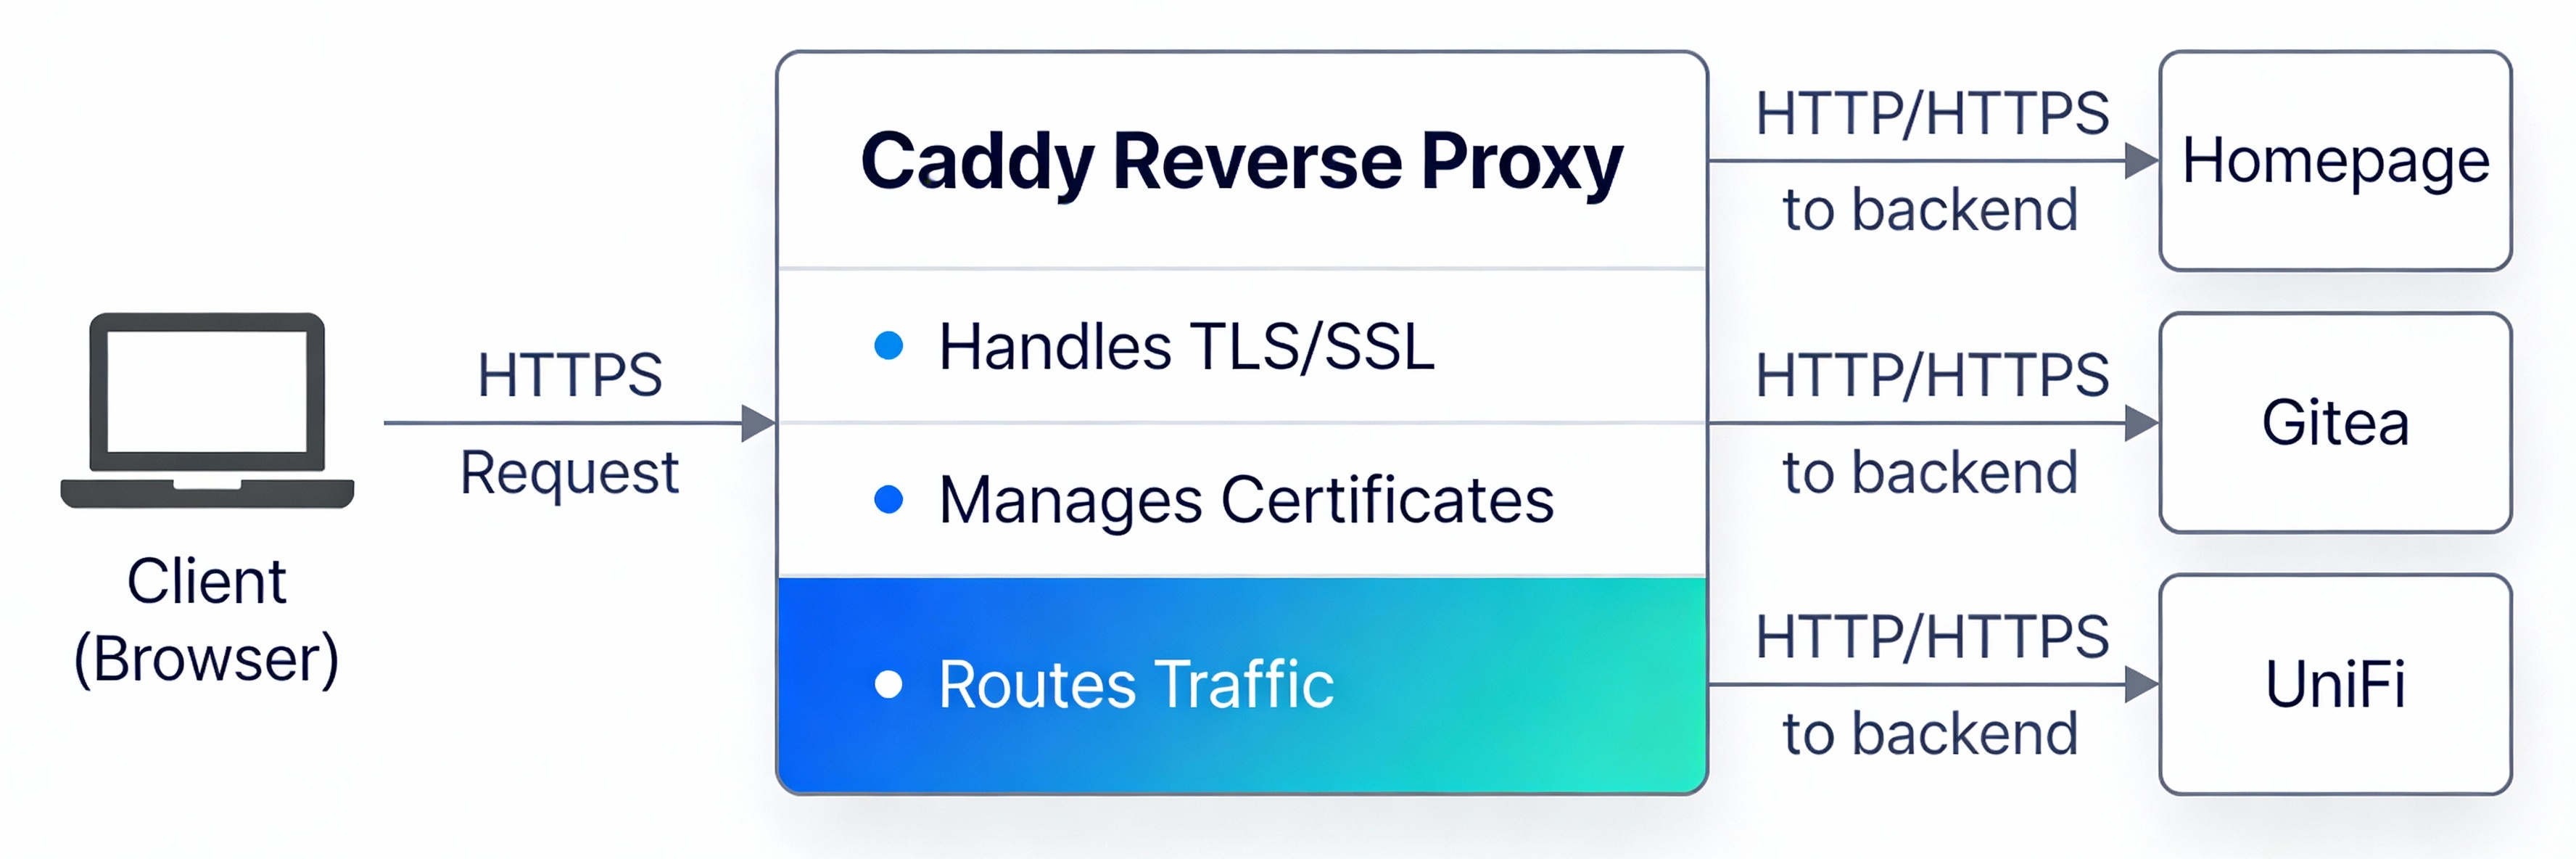
Caddy sits in front of your services, accepts encrypted HTTPS connections from clients, and forwards the traffic to the appropriate backend service. This means your services don’t need to handle SSL/TLS themselves - Caddy does all the heavy lifting.
My Setup
Services Behind Caddy
I configured my key self-hosted services behind the Caddy reverse proxy, each with a clean home.arpa hostname:
| Hostname | Service |
|---|---|
git.home.arpa | Gitea - self-hosted Git |
vault.home.arpa | Vaultwarden - password manager |
rss.home.arpa | Miniflux - RSS reader |
archive.home.arpa | Kiwix - offline Wikipedia |
hub.home.arpa | Home Assistant |
dns.home.arpa | Pi-hole |
The naming convention is intentional: hostnames describe what a service does, not what software runs it. If you ever swap Gitea for Forgejo, or Miniflux for FreshRSS, the hostname stays the same and nothing breaks.
Why home.arpa Instead of Ports?
The old approach was keeping ports and using the server’s hostname directly (homeserver:3001 for Gitea, homeserver:3002 for UniFi, etc.). It worked, but it was clunky.
The new approach uses the officially reserved home.arpa domain for home network use, with one hostname per service - no ports to remember. Caddy listens on standard HTTPS port 443 and routes each incoming hostname to the right backend container. Clean, predictable, and works exactly the same whether you’re on the LAN or connected through Tailscale.
Split-Horizon DNS: The Key to Seamless Access
The magic that makes the same hostname work from both your LAN and Tailscale is split-horizon DNS - two DNS servers that resolve the same hostname to different IPs depending on where you’re connecting from.
| DNS Server | Resolves git.home.arpa to | Used by |
|---|---|---|
| UniFi local DNS | 192.168.y.x (LAN IP) | Devices on your home network |
| Pi-hole (on Tailscale) | 100.x.x.x (Tailscale IP) | Devices connected via Tailscale |
- On the LAN: your UniFi router handles DNS and points
git.home.arpato the server’s local IP. Fast, no VPN needed. - On Tailscale: your DNS is set to Pi-hole (which runs on the Tailscale network). Pi-hole resolves
git.home.arpato the server’s Tailscale IP, routing through the VPN.
Whenever you add a new service, you register it in both DNS servers with the appropriate IP. It’s a small amount of duplication, but it gives you flawless, identical access from any network.
Tip: You don’t need BIND or any fancy DNS view configuration. Two simple static DNS entries - one in UniFi, one in Pi-hole - is all it takes.
Network Architecture
1
2
3
4
5
6
7
8
9
10
11
12
13
14
15
16
17
18
  LAN Device                    Tailscale Device
       │                               │
       ▼                               ▼
  UniFi DNS                      Pi-hole DNS
  git.home.arpa                  git.home.arpa
  → 192.168.y.x                  → 100.x.x.x
       │                               │
       └──────────────┬────────────────┘
                      ▼
              Caddy (port 443)
             git.home.arpa → gitea:3000
             rss.home.arpa  → miniflux:80
             vault.home.arpa → vaultwarden:80
                      │
           ┌──────────┴──────────┐
           ▼                     ▼
        Gitea              Vaultwarden
     (Docker container)  (Docker container)
Technical Details
Setting Up the Docker Network
First, create a shared Docker network that all your services will use to communicate:
1
docker network create homelab
This network needs to be created only once. All your docker-compose files reference this network, allowing Caddy to reach the backend services by their container names.
Docker Compose Setup
Caddy Reverse Proxy - docker-compose.caddy.yml:
1
2
3
4
5
6
7
8
9
10
11
12
13
14
15
16
17
18
services:
  caddy:
    image: caddy:latest
    container_name: caddy
    ports:
      - "443:443"
      - "80:80"
    volumes:
      - ./Caddyfile:/etc/caddy/Caddyfile
      - /DATA/AppData/caddy/data:/data
      - /DATA/AppData/caddy/config:/config
    networks:
      - homelab
    restart: unless-stopped

networks:
  homelab:
    external: true
Using explicit host paths like
/DATA/AppData/caddy/datainstead of named Docker volumes makes it much easier to locate, back up, and migrate Caddy’s data (including certificates) across servers.
Example service - Gitea (docker-compose.gitea.yml):
1
2
3
4
5
6
7
8
9
10
11
12
13
services:
  gitea:
    image: gitea/gitea:latest
    container_name: gitea
    expose:
      - "3000"
    networks:
      - homelab
    restart: unless-stopped

networks:
  homelab:
    external: true
Key points:
- Caddy is the only container exposing ports to the host (80 and 443)
- All backend services only expose ports internally to the Docker network via
expose: - Caddy routes to each service by its Docker container name
Caddyfile Configuration
1
2
3
4
5
6
7
8
9
10
11
12
13
14
15
16
17
18
19
20
21
22
23
24
25
26
27
28
29
git.home.arpa {
    tls internal
    reverse_proxy gitea:3000
}

vault.home.arpa {
    tls internal
    reverse_proxy vaultwarden:80
}

rss.home.arpa {
    tls internal
    reverse_proxy miniflux:8080
}

archive.home.arpa {
    tls internal
    reverse_proxy kiwix:8080
}

# UniFi - skip cert verification since it uses its own self-signed cert
unifi.home.arpa {
    tls internal
    reverse_proxy https://10.0.0.1:443 {
        transport http {
            tls_insecure_skip_verify
        }
    }
}
Configuration breakdown:
- Each block maps one
home.arpahostname to one backend container tls internaltells Caddy to use its own internal CA - no external certificate authority needed- The UniFi block proxies to the router’s IP directly and skips certificate verification since UniFi uses its own self-signed cert
Trusting Caddy’s Root Certificate
Since Caddy uses an internal CA, you need to trust that CA on your devices. You only need to do this once per device, and all current and future home.arpa hostnames will be trusted automatically.
Finding the Certificate
Caddy stores its root CA in the data volume. To find it:
1
find /DATA/AppData/caddy -type f
This lists every file under your Caddy data directory. Look for a file ending in .crt under a path like:
1
/DATA/AppData/caddy/data/caddy/pki/authorities/local/root.crt
Extracting and Trusting on macOS
Copy the root CA to a readable location, then SCP it to your Mac:
1
2
3
# On the server - make it readable
cp /DATA/AppData/caddy/data/caddy/pki/authorities/local/root.crt /tmp/caddy-root.crt
chmod 644 /tmp/caddy-root.crt
1
2
3
4
5
6
# On your Mac - pull the cert over
scp user@192.168.y.x:/tmp/caddy-root.crt ~/Downloads/caddy-root.crt

# Trust it system-wide
sudo security add-trusted-cert -d -r trustRoot \
  -k /Library/Keychains/System.keychain ~/Downloads/caddy-root.crt
For individual service certs (e.g. to trust budget.home.arpa directly if needed):
1
2
3
4
5
6
7
8
# On the server
cp /DATA/AppData/caddy/data/caddy/certificates/local/budget.home.arpa/budget.home.arpa.crt /tmp/budget.crt
chmod 644 /tmp/budget.crt

# On your Mac
scp user@192.168.y.x:/tmp/budget.crt ~/Downloads/budget.home.arpa.crt
sudo security add-trusted-cert -d -r trustRoot \
  -k /Library/Keychains/System.keychain ~/Downloads/budget.home.arpa.crt
Tip: Always import and trust the root CA (
root.crt) rather than individual service certificates. One trust action covers every hostname Caddy manages now and in the future.
Trusting on Other Devices
| Platform | Method |
|---|---|
| Linux | Copy to /usr/local/share/ca-certificates/ and run sudo update-ca-certificates |
| Windows | Import via Certificate Manager or PowerShell Import-Certificate |
| iOS/Android | Email the .crt to yourself, open it, and trust it in Settings → Certificate Trust |
Migrating Caddy to a New Server
One of the best benefits of using Caddy with a known data path is how easy it is to replicate the same setup - and the same Root CA - to a second server. This means devices that already trust your original CA won’t need to re-trust anything.
Copy Caddy Data Between Servers
1
2
3
# From your local machine, copy the Caddy data directory to the new server
scp -r user@192.168.y.x:/DATA/AppData/caddy/ \
        user@server2:/tmp/caddy-backup/
Then SSH into the target server and move the data into place:
1
2
3
ssh user@server2

sudo mv /tmp/caddy-backup/caddy /DATA/AppData/caddy
Fix Permissions After Copy
After copying, Docker (running as root) may have created files owned by root. Fix ownership so user/Caddy can read and write the data correctly:
1
ssh user@server2 "sudo chown -R user:user /DATA/AppData/caddy/"
Now point your new server’s docker-compose.caddy.yml to /DATA/AppData/caddy/ and start Caddy. It will reuse the exact same Root CA, meaning every device that already trusts it will connect without any warnings - no additional manual steps needed on any device.
Benefits
No More Certificate Errors
The biggest win was eliminating certificate warnings entirely. Browsers would still complain about self-signed certs even after manually adding them to some stores. With Caddy’s internal CA trusted once at the root level, everything just works.
Clean, Memorable URLs
Going from homeserver:3001 to git.home.arpa is a real quality-of-life improvement. Bookmarks are cleaner, shareable with anyone on your home network, and don’t require remembering port numbers.
Unified Experience
The same URL works everywhere:
- At home on your LAN?
https://git.home.arpa - Remote on Tailscale?
https://git.home.arpa - On your iPhone?
https://git.home.arpa
Split-horizon DNS handles the routing transparently - you never think about which network you’re on.
Easy to Scale
Adding a new service is three steps:
- Add a block to the
Caddyfile - Add the hostname in both DNS servers (UniFi + Pi-hole) with the appropriate IPs
- Done - HTTPS just works, same hostname from everywhere
Portable Certificates
Because Caddy data lives at a known path on disk (not an opaque Docker volume), migrating or replicating Caddy to a new server is a simple file copy - and all your previously trusted devices stay trusted.
Next Steps
Now that the foundation is in place, I’m planning to:
- Migrate additional services behind Caddy (Jellyfin, Paperless, Yamtrack)
- Set up better monitoring and logging through Caddy’s access logs
- Explore Caddy’s metrics and observability features
- Document the full Caddyfile in my Git repository for easy replication across nodes
Additional Resources
- Reverse proxy quick-start - Caddy Documentation: https://caddyserver.com/docs/quick-starts/reverse-proxy
- RFC 8375 -
home.arpaspecial-use domain: https://www.rfc-editor.org/rfc/rfc8375 - Caddy internal TLS docs: https://caddyserver.com/docs/caddyfile/directives/tls